Your cart is currently empty!

-
How To Create a Beautiful Image Backdrop

Do you love to take quality pictures and video content? Have you ever found yourself trying to take the perfect photograph for your Instagram feed, but your background looks a mess? Maybe you’re a blogger/ vlogger trying to record a video but your shower curtain is photobombing you because that’s the only space where you can create. You could be trying to take the cutest photo of your kid for a special occasion without wanting to pay a photographer for backdrop services. Photography services can be expensive!
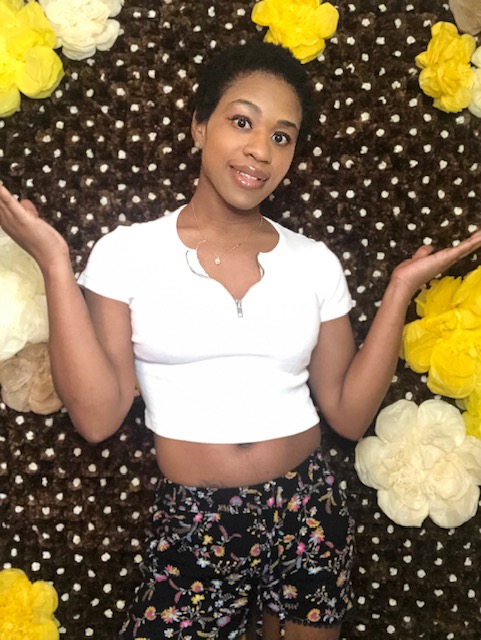
Having backdrops can really enhance your photo and video aesthetic value to your digital content. That’s why professionals like photographers and videographers rely on them so heavily! You, too, can have your very own backdrop sis! What’s even better is that you can make a backdrop yourself, saving money on future professional photography services forever. Woohoo!
So, I hopped on Pinterest to search for ideas for photo/video backdrops and backgrounds. I soon learned the basic essentials of making a flower wall backdrop! This was a great idea, as people use flower walls as backdrops for weddings and baby showers. Pinterest makes everything seem so easy!
Materials Needed for Backdrop
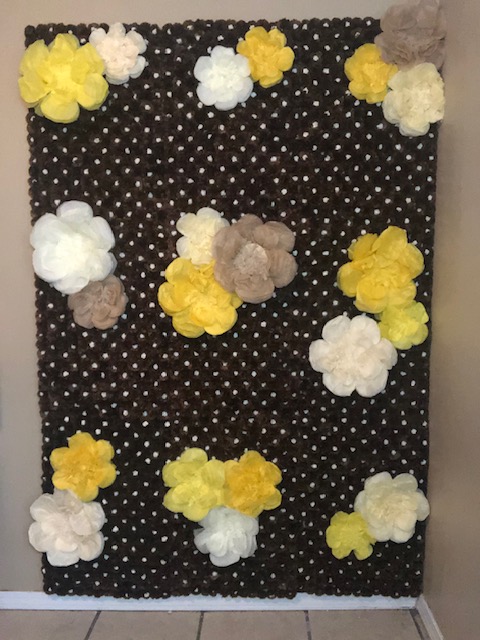
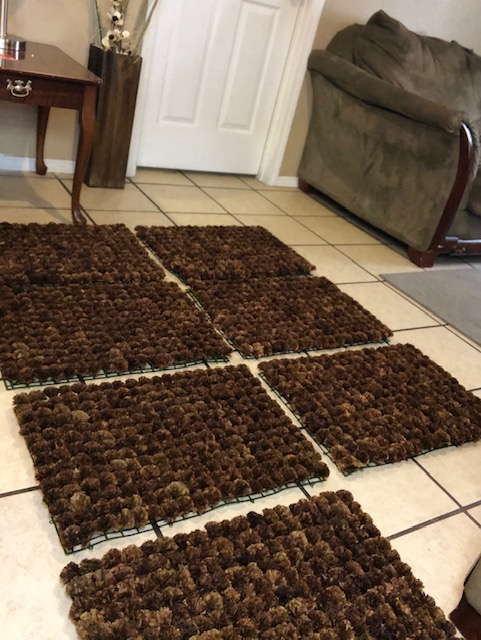
Here’s a list of all the materials that I used to create my Sunflower backdrop wall. The grid panel frames I got from Amazon. All flowers were ordered from eFavor Mart.
Disclaimer: LIFE + STYLE with Kris receives a commission for using Amazon products for the projects that I share in posts. Although I receive a commission for using and linking their products, they are extremely good for my projects. All opinions and suggestions are unbiased.
10-Pack Grid Plant Wall Frames ($25.99)
Hot Glue Gun + Glue Sticks ($9.99)
- 252 Pcs- Chocolate Artificial Mini Carnation Flowers – $14.99/ea
- 6 Pk Ivory and Cream Assorted Size Paper Peony Flowers – $10.99
- Natural and Cream Assorted Size Paper Peony Flowers – $10.99
- Light and Dark Yellow Assorted Size Paper Peony Flowers – $10.99
- 144 Ct. Ivory Paper Mini Flower Roses – $3.99
The steps that I took to building my Sunflower wall actually were as simplistic as Pinterest made it seem to be. There really aren’t many steps involved in building a backdrop BUT it is time-consuming. I could have completed this in less than six days and you may be able to finish it in a shorter timeframe. However, I was not in a hurry to complete this project. I wanted it to turn out beautiful and honestly, I had so much fun making it!
Build Your Panel Frames
I used the beautiful chocolate carnation flowers as what I call my “base” color. The panel size dimensions are 19 x 14in. and require a lot of artificial flowers. There are over 100 pegs to fill! To fill them, simply attach the stem of your artificial flower to the peg on each panel frame. I used nine-panel frames for my backdrop. I originally wanted a combination of different carnations (chocolate and cream) but made a choice to forego it. Buying flowers in bulk can be expensive!
TIP: Think about what color(s) you will use in great detail. The more color you want, the more money you will spend.
Gluing Paper Flowers
If you choose the perfect flower, you may not want to add additional details. I added white paper roses to the center of my carnations for a 3D look. Using a hot glue gun, I glued the roses to every other carnation for each panel frame.
TIP: If you are fine with the flower you’ve already used, then you can easily move on to attaching your panel frames to your wall.

Place Frames on the Wall
Designate your space/area where you will build your frames. I used a wall in our home office because that’s where I go to create most of my digital content. I used thumb tacks to pine each panel closely together evenly.
TIP: Building a full wall is great for full body images. If you are going to use your backdrop for mainly selfies/headshots, you should use fewer (roughly six) panels.

Continue Adding Embellishments: Peony Flowers
The last task for me to execute is adding peony flowers. They arrive flat after ordering, so I had to fluff out 12 paper peony flowers before attaching them to the frames. Each peony has a clear string hook that makes for easy attachment. I love that they also came with peel-off adhesives! I should have ordered more of these (probably will go back and buy more).
Backdrops are easy to do!
Overall, I would rate this project 5 stars on how easy it was to make this. I will most likely continue to embellish with more peony flowers in the future. What is unique about this project is that it’s universal–you can use it for anything! You can easily take it apart and build it again and again for any occasion to add beautiful and amazing detail to your images.
Watch my YouTube tutorial video below to see how I made my beautiful backdrop for less. Please like and share this post if you’ve enjoyed learning how to enhance your digital images. Subscribe to me on YouTube to watch more tutorials and follow me on Instagram to see me share images using my new backdrop!


